Guess I'll start with what I see as a big issue for most people: Flash Usage.
#1) Don't be afraid to use your flash outdoors. If your subject is standing in the shade the camera is likely to read the brighter area and cause your subject to be to dark. If your subject is in the sun and the sun is directly over head it's going to cause harsh shadows under the eyes. If the sun is behind them they will be a silhouette (this is especially relevant for sunset beach photos). If the sun is shining into their eyes they're going to be squicnting and adding a flash isn't going to help - just don't pose your subject with the sun shining into their eyes. Period. For everything elst, turn your flash on. Don't be afraid to take it off the automatic flash setting and turn it to force flash. If you have a point and shoot (we're talking digital) look for the icon of the lightenig bolt and press it and select the icon that is a lightening bolt only (bolt+A = auto; bolt +circle with line through it = no flash; bolt+eyeball = redeye flash - you will never get redeye outdoors during the day; bolt only= flash on/forced flash - means the flash will fire ever time no matter what). Using the flash like this is called Fill Flash, you are "fillin in" the picture with some extra light. *Also great if your subject is wearing a ball cap*
 (picture found online) While this is not the greatest picture ever it is a good representation of what "average-picture-taker-mom-and-pop" shoot. It would better if they had turned the flash on.
The next photo we're going to pretend was not intended to be the silhouette that it is. This (if you actually want to see the faces of your friends) is a great example of when you should turn the flash on.

Below we see proper use of the flash (though not the greastest compostion we're going to refer back to "mom-and-pop". Either the photographer was spart enough to use of the flash, or as would be the case in most situations like this, you remembered to turn on the force flash before you handed you camera over to that stranger that was walking by that was kind enough to take the picture for you. 
 Good shot! (again not mine... I really do shoot but my photos are either trapped on my external hard drive until such time as I can get the software re-installed or they are trapped by copyright on Flickr. Sorry)
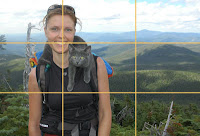
#4) Composition. This could be a post on it's own so I'm just going to touch on one aspect concerning a single subject. Don't frame your subject in the smack dab middle of the frame!!! I cannot say this enough. It's just not visually pleasing. Think of your viewfiner or LCD like it's a tic-tac-toe board (some cameras actually have a grid you can turn on in your display functions). "See" where the lines intersect? Taking a super close-up? Put the intersections on the eyes or betweent eh eyes. Taking a further back shot with lots of background? Put the whole subject so they are mainly on an interstecting line. See how much more visually appealing that is? This is also called the "Rule of Thirds"


#2) How to hold your camera for vertical shots. This is just a little personal trick I have developed over the years because I take so many vertical shots. I used to go arm-over-head, meaning my shutter release hand was at my forehead, but after a while my arm would get tired. It's also a less steady stance as your arm, or your "chicken wing" as I call it, is flapping in the wind. Go the otehr way. Shutter release hand to chin. Yes, you kinda have to change how you hold the camera, but since you should have 2 hands on the camera it's not been a problem for me and my arm gets less tired. Also, your "chicken wing" is nowbraced against the core of your body so your shots should be more stable.
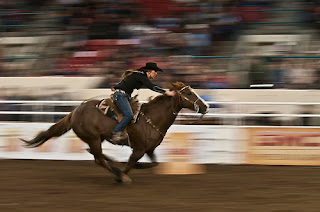
#3) Stopping action with Panning. Want to get that shot of your kid running the football down the field, ridding their bike, and other stuff that can happen in a in a straight parrallel line in front of you? The ones where the subject is (hopefully) in focus and the background does that sideways streaky blur? How to do it? PRACTICE!!!! You won't get it right the first or the tenthe time you try it. You have to learn to become steadyand smooth. Learn to do this and you can progress into longer exposures handheld (unrelated to panning). Stand with your feet shoulder width apart (I think I also put one foot slightly forward). Tuck your wings in to your sides. Focus on your subject and hold it. Take a breath and hold that too. Follow your subject. Follow.... folllow....follow (no I'm not singing The Yellow Brick Road song). Now SHOOT!! (This is where continuous shot comes in handy - hold that shutter release down and keep following). Follow through... jsut like golf and tennis. Don't stop following until after you release the shutter. If after many many... many tries you are still getting blurry pictures you might have to go with a tripod.
#3) Stopping action with Panning. Want to get that shot of your kid running the football down the field, ridding their bike, and other stuff that can happen in a in a straight parrallel line in front of you? The ones where the subject is (hopefully) in focus and the background does that sideways streaky blur? How to do it? PRACTICE!!!! You won't get it right the first or the tenthe time you try it. You have to learn to become steadyand smooth. Learn to do this and you can progress into longer exposures handheld (unrelated to panning). Stand with your feet shoulder width apart (I think I also put one foot slightly forward). Tuck your wings in to your sides. Focus on your subject and hold it. Take a breath and hold that too. Follow your subject. Follow.... folllow....follow (no I'm not singing The Yellow Brick Road song). Now SHOOT!! (This is where continuous shot comes in handy - hold that shutter release down and keep following). Follow through... jsut like golf and tennis. Don't stop following until after you release the shutter. If after many many... many tries you are still getting blurry pictures you might have to go with a tripod.
Good shot! (again not mine... I really do shoot but my photos are either trapped on my external hard drive until such time as I can get the software re-installed or they are trapped by copyright on Flickr. Sorry)#4) Composition. This could be a post on it's own so I'm just going to touch on one aspect concerning a single subject. Don't frame your subject in the smack dab middle of the frame!!! I cannot say this enough. It's just not visually pleasing. Think of your viewfiner or LCD like it's a tic-tac-toe board (some cameras actually have a grid you can turn on in your display functions). "See" where the lines intersect? Taking a super close-up? Put the intersections on the eyes or betweent eh eyes. Taking a further back shot with lots of background? Put the whole subject so they are mainly on an interstecting line. See how much more visually appealing that is? This is also called the "Rule of Thirds"
#5) How to make people think you used a much better camera than you actaully did. This one is a little harder to achieve. You need to learn. Learn what ISO is and how to choose the appropriate setting (again this could be an entire post but I'm doing #5 to showcase one of my favorite pictures). Learn how to turn your flash off (see #1). Learn how to be super steady for a longer exposure (keep the shutter button pressed down until the picture is done - you can shake the camera jsut by taking your finger off the shutter button. Alng with parts of #3). So... concert photography... Don't use your flash unless you just want pictures to show you were there. If you want a photograph, turn off your flash, turn your ISO up about as high as it will go (800 at least), get there early so you can get in the front row (gives you more ambient light to work with), and take lots of shots and you're sure to get something that will wow everyone. If you get home and there's one that's not too bad but something isn't quite right, maybe it's too grainy, change it to black and white... voila, astistic shot!
The last 2 pictures are most certainly mine (I finally figured out a way around my copyright download protection). Thie first one shows great use of the ambient light (getting lucky when a spotlight shines). The second of taking a good composition that maynot have great color and changing it to black and white to get an awesome artsy shot. Now, would you believe those were shot with a Canon SD600 digital point and shoot camera (6MP)?
That's all for now. Hope these tips help you out. Let me know if you have any questions!
No comments:
Post a Comment