Wearing History is giving away some patterns.
I would love to make several of these, but especially the Edwardian Blouse and that cute little blue dress!
Wednesday, December 11, 2013
Thursday, December 5, 2013
Project Runway Re-Creation #1 - Part 4 - The Dress
Here's how the dress came together in the final fabric.

Putting the skirt panels together:

Trying to get the pleats right:

And here's the finished dress (but not the vest yet, that will be another post).
Front view:

I'm very happy with how it turned out and the fit. I have impressed myself!
Back view:

Side view:

What it not shown here is the buttons and chain I added to the cuff later on.
Look, I even did seam finishes!!!!

Nicely set in sleeves that fit me better than any sleeve I have ever put in.

Cuffs adapted from the 1940s pattern I took the sleeve from. I just cut 2 instead of folding over and then cut the sides at an angle to get this look.

I really hope I took pictures of the vest and that the pictures are just hiding from me at the moment. I did get to wear the completed outfit to a Halloween party recently and 1 person knew exactly what it was, so exciting!
Shoes ...
http://papermothballvintage.blogspot.com/2013/12/giveaway-with-american-duchess-shoes.html
Paper Mothball Vintage is giving away a pair of American Duchess 23 Skidoo shoes.
A nice 1920s shoe. I've only recently gotten into the 20s style. Will need shoes eventually.
Paper Mothball Vintage is giving away a pair of American Duchess 23 Skidoo shoes.
A nice 1920s shoe. I've only recently gotten into the 20s style. Will need shoes eventually.
Sunday, November 10, 2013
The 2014 "To Do" List
"To Do" list is probably a bit presumptuous. Think of it more like a "list of things that I would like to one day accomplish but to do them all in 1 year might be a far stretch of the imagination". I tend to forget about things that I want to get done, so a couple of weeks ago I sat down and wrote out a list and keep adding to it when I remember something else or buy some new fabric for yet another project. I also think that it will help in completing projects for the Historical Sew Fortnightly 2014. I tried to do it this year but I think I only officially finished 2 things at the beginning of the year. None of the other challenges fit with what I had planned to work on this past year or I couldn't think of anything simple to do out of what I had. So, now when a new challenge comes up, I can look down my list and see what will work. With the first 3 challenges already announced for next year, it seems to be working so far as I have found items on my list that will work and now I have time to prepare to complete them. So, here's my "To Do" list:
We shall see at the end of next year how much gets done. Mock-ups for item #1.2 & #1.3 need to get done before Thanksgiving so the fit can be checked while I'm at my mom's for Thanksgiving.
- Memorial Day Dresses
- Me
- Stays
- Pet en l'air
- Petticoats
- Hat
- Mom
- Dress
- Cap
- Dog
- Dress
- Tiny Hat
- The Duchess: Fox Dress (hopefully for Halloween)
- 1940s Polka Dot Dress (from grandmother's pattern)
- Lobster Tail Bustle
- Blue/Green 18th c. Polonaise
- Regency Dress (from sheets found at thrift store)
- Titanic ear dress made from a sari
- Blue/Gold Frock Coat
- Caraco (from table cloth found at thrift store)
- Blue Flowered Polonaise, Pet en 'air, or caraco
- Recover umbrella
- any of the 1940s/50s patterns
- Something from the pink plaid fabric
- thinking a Natural Form skirt for HSF14 Challenge 3: Pink
- "Minnie" photo re-creation (an antique photo of a woman named Minnie I found. Unique prints).
- Corsets
- 1910 Long Line
- 1865-1880 Pattern bought at Teslacon
- This might end up being my "Hugo Boss/Calvin Klein" Corset made from thrift store men's shirt.
- Corset from gold silk shirt (unsure what year I will do but I have a bunch of patterns saved on my computer so this will probably also be a "learn to scale up a pattern" corset.
- Regency stays
- Chemise a la Reine (HSF14 Challenge #2: Innovation)
- Remake antique black 1910s/20s dress (learning to pattern from existing clothing)
- Vintage swimwear
- Remake vintage lingerie (patterning from existing clothing)
- bullet bra
- Edwardian cotton slip
- Corset Cover
- Pantaloons or pantalettes (or both :) )
- More petticoats (for layering)
- 18th c.
- 19th c.
We shall see at the end of next year how much gets done. Mock-ups for item #1.2 & #1.3 need to get done before Thanksgiving so the fit can be checked while I'm at my mom's for Thanksgiving.
Wednesday, October 23, 2013
Steampunk Roller Derby - Part 2
TIME FORE TEA...................
One of the things that I learned in college and use on the more often when costuming is tea dying. We had a project on natural dyes. We had scraps of t-shirt fabric and we were instructed to present X# of natural items that would dye the fabric. Or course there was the standard tea and coffee, but other options that were presented overall were grape juice, mustard, black walnut hulls, and strawberry daiquiri mix.
In case you have never experimented with tea or coffee dying, I will give you a general step-by-step instruction.
**If you're a first timer, do test swatch in small bowl first to see how your fabric takes the tea (or coffee)**


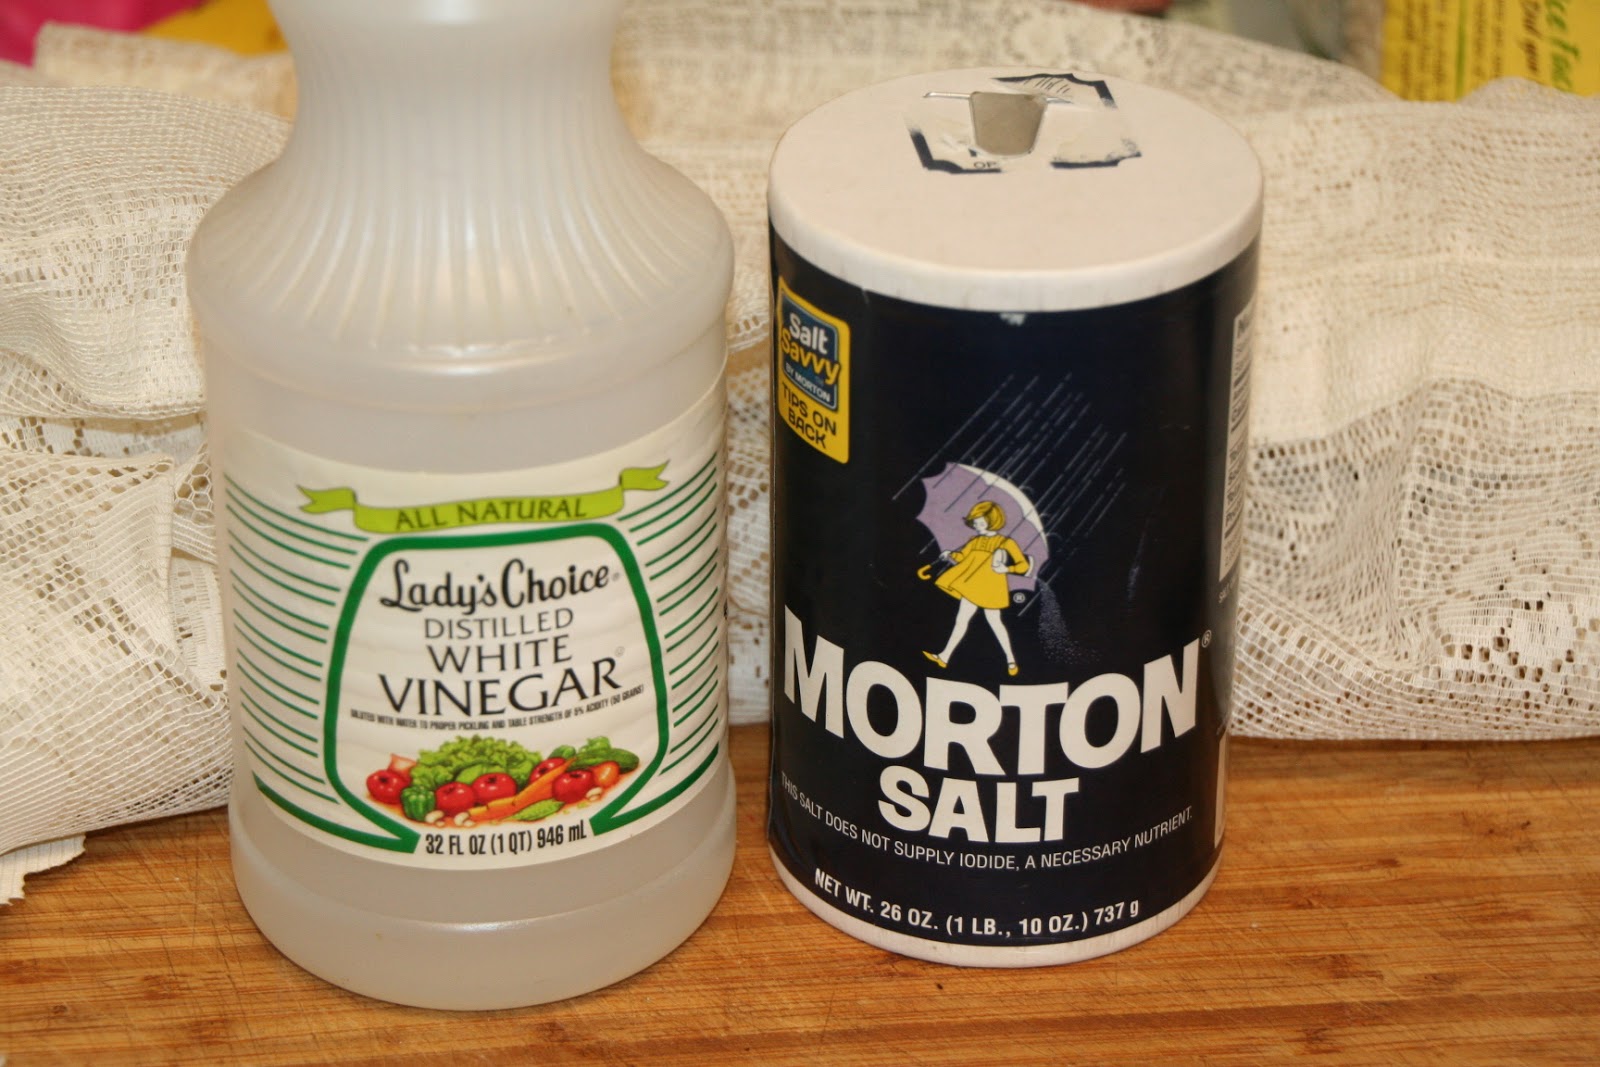
Step 3: I do not remember what the measurements were for this step, I usually just put "some" in. White vinegar and salt. If I had to guess, for the size pot I used, I would say 1/2-1 cup of vinegar and maybe a 1/4 cup of salt. These both help to set the color (also tossing the fabric in the dryer to heat set it when you're done, if the fabric can handle the dryer).


Step 4: Toss in the fabric, let it simmer for a while (30min - 1 hour), then turn off the heat and let it sit until the desired color is reached. If the color is achieved during the simmer, go ahead and take it out. Rinse it in cold water until the water runs clear. Heat set in the sun or dryer. (Make sure to heat set before it's ever run through a regular wash cycle with detergents)

A great use for unused morning coffee: do your sample with it. Which is what I did one morning before leaving for work. I just poured the leftovers in a big mug, added a little vinegar and 1 of my doilies. I let it sit all day.


 Before and After of the small, orange and white doily. The coffee did as I hoped and turned the orange into more of a brown color.


 Before and After pictures of the larger orange doily, it maintained more of it's orange color than the smaller one. I guess I forgot to take pics of the other 2 and the lace curtains. Oops. Oh well, they will show up again in the skirt assembly.
One of the things that I learned in college and use on the more often when costuming is tea dying. We had a project on natural dyes. We had scraps of t-shirt fabric and we were instructed to present X# of natural items that would dye the fabric. Or course there was the standard tea and coffee, but other options that were presented overall were grape juice, mustard, black walnut hulls, and strawberry daiquiri mix.
In case you have never experimented with tea or coffee dying, I will give you a general step-by-step instruction.
**If you're a first timer, do test swatch in small bowl first to see how your fabric takes the tea (or coffee)**
Step 1: Get out your biggest pot, fill it with water and start heating on the stove.

I happen to have this wonderful spaghetti pot that has a strainer that fits down in it so that when things are done I just have to lift the strainer and voila... darined!!!!
Step2: Put about 6-8 family size tea bags in the water.


The darkness of the resulting color will depend on how many tea bags are used, how long you let the begs steep, and how long you leave the fabric in. With harder to dye fabric like the curtains I used, I left the tea bags in the entire time and I let the fabric sit in the water over night.
Step 3: I do not remember what the measurements were for this step, I usually just put "some" in. White vinegar and salt. If I had to guess, for the size pot I used, I would say 1/2-1 cup of vinegar and maybe a 1/4 cup of salt. These both help to set the color (also tossing the fabric in the dryer to heat set it when you're done, if the fabric can handle the dryer).
Here's the before pictures of the fabric I needed to dye: 2 lace curtain panels.

Step 4: Toss in the fabric, let it simmer for a while (30min - 1 hour), then turn off the heat and let it sit until the desired color is reached. If the color is achieved during the simmer, go ahead and take it out. Rinse it in cold water until the water runs clear. Heat set in the sun or dryer. (Make sure to heat set before it's ever run through a regular wash cycle with detergents)

Option: Dying with coffee.


 Before and After of the small, orange and white doily. The coffee did as I hoped and turned the orange into more of a brown color.
Since my results were good, I went ahead with the rest of the doilies. After I had the curtains sitting in the tea, I made extra strong batch of coffee, added some salt and vinegar and the rest of the doilies.

I let them sit in the mixture for several hours until they had a good color. Then, I randomly just dumped it all in with the tea and let it continue to soak for the remainder of time I had the curtains in for.

 Before and After pictures of the larger orange doily, it maintained more of it's orange color than the smaller one. I guess I forgot to take pics of the other 2 and the lace curtains. Oops. Oh well, they will show up again in the skirt assembly.
Next step will be the assembly of the skirt.
Monday, September 30, 2013
Steampunk Roller Derby - Part 1
Remember how I JUST said an update will have to wait? Well, I forgot I had a post written and was waiting to post it. Go me!
So, I had been planning on making a pair of bloomer shorts for the Steampunk Roller Derby Outfit for TeslaCon. I already have a pair of pants I picked up at the thrift store just for this purpose, and I will still make them. But last night I saw a skirt on Etsy that was just a big mix of satin, lace, ribbon, & doilies and it inspired me.
It kinda looked like this, but this is not the skirt I saw, I can't remember how I came across it in the first place :) Ooooh, look at these cool spats the seller has too! OK, I'm getting distract..... ooh sparkly! This is pretty. Adding this seller to favorites, she has lots of stuff I like! Actually surprised that wasn't the shop where I found the other skirt.
Tomorrow is 50% day at the thrift store near my work so I'm going there with a plan of raiding the lace curtain sheers, place mats, doilies, table runners, & prom dresses. Then 'll need to pick up some tea when I go to the store so I can do a natural dye on them. I'm not necessarily looking for all cream pieces, I'll probably pick up a few of different colors for a little splash here and there. Not sure if I'm going to put it on an elastic waistband or a normal one. I just hope this thing comes out like what I'm imagining.
2 thrift stores provide some supplies: 1 large, beige, circular table cloth with a lace edge; 2 lace curtain valances (won't use both but thought 1 could be made into a stand-alone skirt); 5 doilies, 1 handkerchief; & 2 belts.

A close up of the doilies and a handkerchief:

This large doily is a great color:

Then I found these 2 belts. The dark brown sequin one is more of a sash-type belt. Love the belt buckle on the gold one.

Next up, I will put my college education to work and do some natural dying with tea and coffee. Stay tuned.
Where have I been?
I promise to update when all the Halloween stuff is finished - I just can't take the time to write a full post right now..... 4 weeks to go and too many things to finish.
Monday, September 9, 2013
1930s Shoes!!!
So this past week, I had the task of going through my grandmother's photo albums to find pictures of her for her memorial service. Album after album of old photos where I only knew a fraction of who was in them. Then my mom plops an album on the bed that came out the bedside table. I'm going through it and thinking something just doesn't seem right for it being my grandmother. I come across this.....
and I wonder.... could this be my grandmother and her sisters???? She was born in 1925 and was the oldest of 4 daughters. That little girl in the dark jacket looks to be about 6 or 7, right? Then I think... is THAT my great graandmother?? I knew her when I was younger but all the pictures I had ever seen of her were from the 1950s-1980s. Was it another relative?? I HAD to know!!! Well, I guess my grandmother decided on a rather sad way of getting me the answers I needed. She passed away on Wednesday, September 4th. I was 2 hours into a 12 hour drive from Alabama to Ohio when my mom called and told me to turn around. I had gone home to see her for what I knew would be the last time. So, another 2 hours later I enter the house and find her youngest sister (not pictured because she wasn't born yet) sitting on the couch. After doing all the sad stuff, I grabbed that album and sat down next to Aunt Linda ... the last remaining person who could confirm or deny my suspicions and identify all the pictures. And she said, yes, that was her mother! Eureka!!! I'm so in love with this picture of her!!! The hat! The coat!

AAAHH She's just the perfect picture of the 30s!!! Of course internet costuming dork that I am I think, "American Duchess has something similar to this." Well, hers are 1920s "23 Skidoo" - but maybe Myra's shoes were a favorite pair that she still wore.. who knows.The album turned out to belong to my great grandmother: Myra Blanche Campbell Merideth Bunch. I was able to figure this out by the way my grandmother had signed some pictures and then 2 Mother's Day cards in the back signed the same way. Such an amazing find (more later on the other things unearthed in the house as we went through cupboards and closets).
Now, American Duchess is offering a 1930s shoe... "The Claremont"!! Super cute.

and I wonder.... could this be my grandmother and her sisters???? She was born in 1925 and was the oldest of 4 daughters. That little girl in the dark jacket looks to be about 6 or 7, right? Then I think... is THAT my great graandmother?? I knew her when I was younger but all the pictures I had ever seen of her were from the 1950s-1980s. Was it another relative?? I HAD to know!!! Well, I guess my grandmother decided on a rather sad way of getting me the answers I needed. She passed away on Wednesday, September 4th. I was 2 hours into a 12 hour drive from Alabama to Ohio when my mom called and told me to turn around. I had gone home to see her for what I knew would be the last time. So, another 2 hours later I enter the house and find her youngest sister (not pictured because she wasn't born yet) sitting on the couch. After doing all the sad stuff, I grabbed that album and sat down next to Aunt Linda ... the last remaining person who could confirm or deny my suspicions and identify all the pictures. And she said, yes, that was her mother! Eureka!!! I'm so in love with this picture of her!!! The hat! The coat!

THE SHOES!!!!!!!
AAAHH She's just the perfect picture of the 30s!!! Of course internet costuming dork that I am I think, "American Duchess has something similar to this." Well, hers are 1920s "23 Skidoo" - but maybe Myra's shoes were a favorite pair that she still wore.. who knows.The album turned out to belong to my great grandmother: Myra Blanche Campbell Merideth Bunch. I was able to figure this out by the way my grandmother had signed some pictures and then 2 Mother's Day cards in the back signed the same way. Such an amazing find (more later on the other things unearthed in the house as we went through cupboards and closets).
Now, American Duchess is offering a 1930s shoe... "The Claremont"!! Super cute.
Sunday, June 9, 2013
Project Runway Re-Creation #1 - Part 3 - The Pattern
Today's project was creating the pattern so I could figure out how much fabric I need to buy. I started by ripping out all the seams of the dress and ironing all the pieces flat. Also, as a starting point, I folded on the center front line so that I could cut off half the fabric and just use the best side.


Once I had all the pieces marked and identified, I traced them onto thick brown paper so that 1) when I cut the real fabric there will less chance anything will stretch and 2) since I used so many different fabrics, I needed all the pieces to look uniform for change. I was starting to get the pieces mixed up.


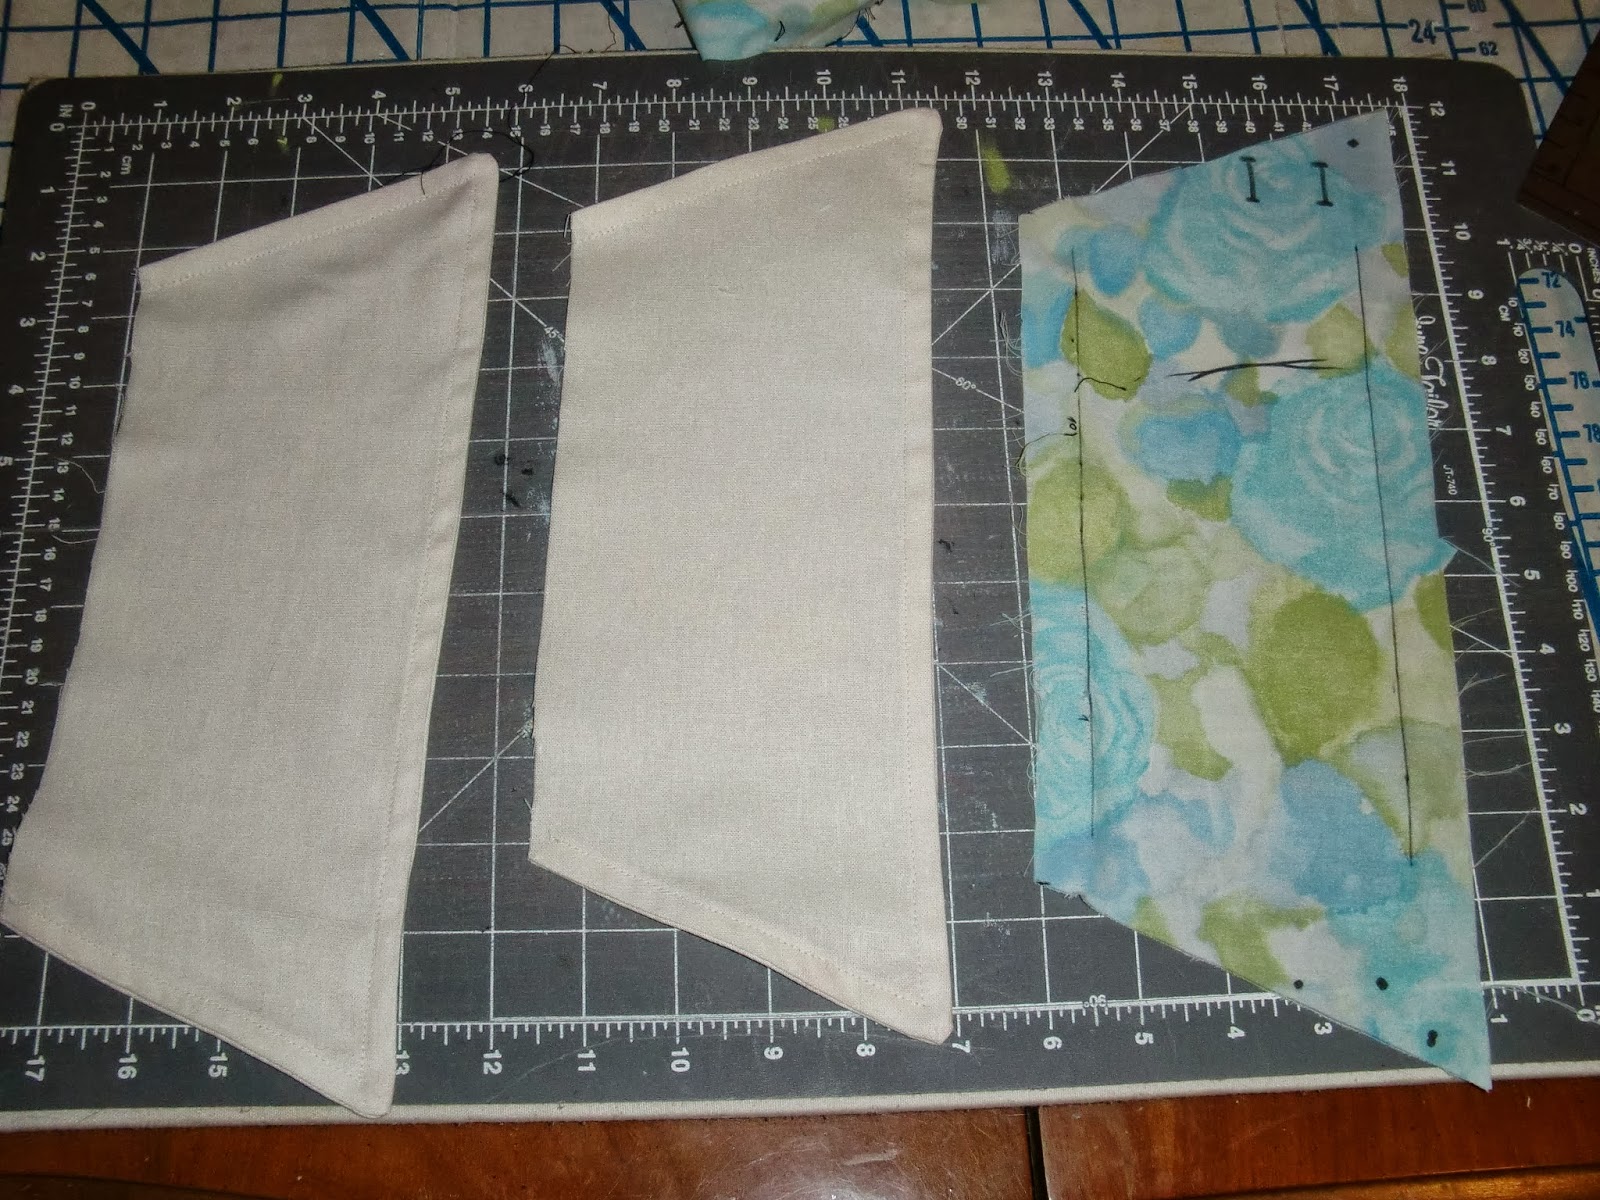
I have marked where the pieces will be "cut on fold", and where the pleats will com from and meet at. I numbered each piece like a real pattern and drew grain lines where necessary.

The long black line in the center of this piece is where the inside of the pleat will fall and where I will place a seam so that 1) the pattern fits on the width of fabric I have and 2) the seam will be hidden and not visible when the dress is worn... or at least that's the idea. All of the skirt pieces had to be cut into additional pieces so that they will fit on the fabric.

Once I had all the pieces marked and identified, I traced them onto thick brown paper so that 1) when I cut the real fabric there will less chance anything will stretch and 2) since I used so many different fabrics, I needed all the pieces to look uniform for change. I was starting to get the pieces mixed up.

Transferred all the markings.

Cut all the pieces out.

I HAVE A PATTERN!!!!!!!
At this point, I had to strategically place the pieces on my cutting board to figure out how many yards of fabric I will need. I almost messed up because at first I figured all the pieces, forgetting that the lower portion was going to be in a different color. So I had to re-arrange them. I think (hope) that 3 yards will be enough for the main portion and while I haven't measure out the bottom portion on the fabric I have for that, I'm fairly certain I have more than enough.
Saturday, June 8, 2013
Project Runway Re-Creation #1 - Part 2
Finally getting to move forward on this project. I've been waiting for fabric samples to come in from some online sources to help make my decision on what the main portion of the dress will be made from. Locally, I had decided on a linen-look fabric if I didn't like what I could find online. After a re-shipment of a lost package from Fabric.com finally arrived yesterday with some nice fabrics that I might order for future project, I have decided to go with the 1 sample I ordered from TrimFabric.com - a Textured Crinkle Crepe in Ivory. At $4 a yard, it's roughly the same price as the linen-look at Jo-Ann's and I like the texture better. I will have to at least flat line the skirt because the fabric is a little thin, and then with the extra weight, it will hang a little better.
So, today's project is just un-assembling the mock up to make the pattern pieces to be able to figure out how much fabric I will need. The Crepe is only 52" wide. Not sure how the skirt is going to piece together with this limitation. If I need to add additional seams, I'm going to have to try to place them in the inner crease of the pleats so that they don't show on the outside.
*****************************
Other things in progress:
- Re-Creation #2
- Shirt bodice is cut and all tucks sewn
- Need to cut sleeves
- Bought lightweight interfacing for cuffs
- Skirt cut from some linen-ish fabric found at the thrift store. Hurray for 2 1/5 yds of fabric for $3!
- Still trying to find a 12", Invisble, Hunter Green zipper.
- Derby skirt
- Tea dyed all fabrics that needed it.
- Bought random fabric at Jo-Ann's for the misc ruffles.
- Decided it will be a fixed waistband with a zipper rather than an elastic waist band
- bought zipper
Tuesday, June 4, 2013
Etsy Coupon
While I sit here patiently waiting on fabric swatches to arrive from Fabrics.com (they had to re-send them because they never arrived), let me offer you some free shipping on purchases of $15.00 or more from my Etsy store. There's a link on the side of my blog, or just click here. Use coupon code "freeshipping" at check out! This offer is good through the end of this month (June 2013).
Thursday, May 30, 2013
Project Runway Re-Creation #2 - The Planning.


The second piece I fell in love with from Michelle Franklin's line. I love the skirt, especially the decorative part on the hip. Also the breast-plate piece is pretty awesome too.
This is the pattern I selected for the shirt:

The runway piece buttons up the entire back, but since I pretty much suck at button holes (I only learned to make them 2 years ago and have only done 1 other piece that required them), I am perfectly fine with this pattern only having 1 button at the neck. I probably will not attempt to put a collar on it because I'm not really a collar kind of girl and I can picture it without fairly easily.
The fabric for the shirt:

Honestly, I forgot that the green was more of an olive color, but it wouldn't have made a difference since the fabric store didn't have that shade of green. This hunter green is nice though and I already have thoughts and plans for additional colors to make to change it up.
This is the pattern I selected to use for the skirt:

It's not exactly right, but I haven't really looked closely at the pattern pieces yet to see if I will be able to alter it to the uneven hem line or not. Regardless, I still like the pattern and had been looking for an excuse to buy it. (I think it would make a great Pan Am costume). The chiffon flounce at the bottom I plan on making detachable so that I can change the color or just wear it without the flounce.
Tuesday, May 28, 2013
Project Runway Re-Creation #1 - part 1
When I saw this come down the runway on the finale of this season's Project Runway, I fell in love!

It's a creation by the winner, Michelle Lesniak Franklin and her entire line was very Steampunk inspired. So, seeing as I had just purchased my tickets to TeslaCon (will be my first time attending), I knew I was going to need some new outfits, so I decided this would be a great opportunity to advance my non-existent patterning skills.
This is the preliminary sketch I made while watching the show:

This is the pattern I purchased for a starting point based on the above sketch:

This is the revised sketch after downloading every available picture I could find:

This is when I realized would be learning a LOT more about pattern alterations. The pattern above was just 2 pieces for the dress.


Using a bed sheet purchased from the thrift store I first converted the front piece to "cut on fold" so there would not be a center front seam. The back I eventually left to be cut as 2 pieces so I can put a zipper in once I make the top fitted enough so that it can't just be slipped over the head. Going through my reference photos, I figured out where to cut the pattern to create the seams

Mock up of the bodice:


Adjustments to the initial pattern as I progressed:

Starting to figure out the pleats on the upper skirt:

Added the lower skirt:

(I've been using up what was once my quilt fabric stash.)
Continuing on to the sleeve:

I used the sleeve from this pattern that I plan on using for another re-creation once I finish this one:
After doing the test run, I need to lengthen it by 2 inches to get the cuff to start right at my wrist instead of ending there like on the pattern. I measured around my wrist and around where I want the cuff to end (about 1/2 way down my hand) and cut the sides of the cuff pattern. The non-doubled over width of the cuff is almost perfect once I take the seam allowance into account. I just have to remember that the cuff opening needs to be on the top side of my hand and not lined up with sleeve seam. I really like the way the sleeve is turning out. It has just a little bit of gathering at the cap. I will also need to widen the shoulders of the dress just a little bit so that it's not quite so wide-necked.
So, now I just need to make a fabric selection for the main portion of the dress and then figure out the over-vest. Other things I need to not forget about when putting the final garment together:
- Don't forget to lengthen the sleeve
- Don't forget to widen the shoulders (and add seam allowance)
- Interfacing and lining on the bodice.
- Test transparency of main skirt fabric. flat line if needed
- Angle and trim more from front to back
- Practice seam finishes, the back seams will be visible, make them look nice.
- Invisible zipper on dress, exposed zipper on over-vest.
- Make a small purse to attach like original garment. Do this instead of worrying about making pockets; pockets might ruin the lines of the dress.
- Don't make sharply pressed pleats, trying flattening them by hand.
- Don't forget to mark on the mock up where all the pleat folds are.
Subscribe to:
Posts (Atom)