These are the patterns I used. I bought them when they first came out, probably around the time Marie Antoinette staring Kirsten Dundst came out. They are now discontinued but you can still find them on eBay. I did not make the panniers on undergarments pattern because I knew that I would need to easily get in and out of car (I had to drive myself to 2 parties wearing it). I opted for pocket hoops because 1) they collapse for ease of maneuvering in crowds and through doorways, and 2) they are like purses that you don't have to carry. They have closed bottoms and slits in the top so you can access them through the dress which also has slits. I did however start the entire project by making the tie on pockets from the pattern (I wasn't thinking clearly and was just excited about making pockets. I'm hoping to one day possibly embroider them).
Cutting the pattern out. Sookie is helping :)
The inspiration pieces with the fabric that I ended up choosing. I had originally had other fabric in mind but then I saw this and couldn't get it out of my head. Normally $9/yd, I waited for a 50% off coupon. I also decided to do the underskirt in a coordinating solid color that was cheaper to reduce some of the expense (I think one day I might splurge and redo the underskirt in matching fabric for a little more authentic). Neither the mask not the bird got worn with the dress and at the last minute I added a white plume tot he flower to add some extra pluminess!
Ruby does quality control on the fabric. I was not amused!
See... this is the sewing on of the ruffles of the chemise.
Lining going into the stays.
Lining is in!
The front side showing the boning channels. Still to do at this point: decorative trim over seams, binding, and grommets (I did decide to do grommets instead of hand stitched eyelets so that they would be more sturdy.)
See!!!!!! (And only cost $10!!!!!)
Skipping ahead 1 1/2 rolls of thread and ungodly amounts of time spent hand stitching trims....
See all the trim on the right side? It started out being pink like the right side. I had had this image in my head when I had purchased all the fabrics.... this image did not involve the pink trim making the dress look like a friggin' cupcake! Before I pulled off the trim on the right and started replacing is was when I made my plea to American Duchess. It went something along the lines of "Help! I think I hate it!" Then I found this on her Pintrest board and pulled off all the pink and redid all the trim (at this point I had already put a weekends work of work into the trim and was now looking at another weekend to change it all!)
Taking a break from the dress, I got inspired to work on my shoes.
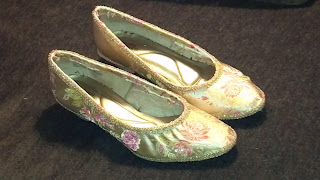
I found them at the thrift store for about $5 (actually I think they may have been 50% off that day so I possibly only paid $2.50). They look like shoes someone bought to wear to a wedding and then never wore them again. They had the general shape was I was looking for. I know they not perfect for 18th century but they will just have to do until I can afford a pair of Devonshires. (Christmas is right around the corner. Hint! Hint! I wear a size 8.5 and they are on sale right now!)
3 DAYS!!!!
It took me three days (OK nights) of shoving a needle through shoe leather with pliers to get these done. I broke 3 needles and strained a muscle in my arm!
I just kinda laid the fabric over the shoe and then started pinning it to the form of the shoe. The edge is turned under at the sole of the shoe so there wouldn't be any frayed edges.
It was too hard to turn the edge on the inside and the shoes were already tight enough that I didn't want to risk them being unbearable.
The only seam is at the heel. I did
TheeeeeEEEeeen.... I splurged and bought clocked stockings from American Duchess!
Of course I had to have red heels!
Soooo long story short. I started on the project around March I think. There were times I went days, weeks, maybe a month without working on it but that's why I gave myself so much time, so I wasn't trying to make it in a matter of a few weeks. I was still stitching little fixes up until the night before the biggest party. (The first party ended up being a trial run and I had to redo the hem on the both the dress and the underskirt because they were way too long.
Stay tuned for the next entry on how all the pieces come together to form the overall look!


Very Impressive Dixie!
ReplyDeleteThanks! I enjoyed most minutes of it :)
ReplyDelete